Easy Bunny Cake-Fun Easter Treat
Easy Bunny Cake Recipe: Get ready to hop into spring with the most adorable and delicious dessert you’ll make all season! This easy bunny cake recipe is a guaranteed crowd-pleaser, perfect for Easter celebrations, birthday parties, or just because you want to add a little whimsical charm to your day. We all love a cake that’s as beautiful as it is tasty, and this bunny cake absolutely delivers. What makes this particular easy bunny cake recipe so special? It’s incredibly simple to assemble, making it a fantastic project for bakers of all skill levels, including kids! You don’t need to be a master decorator to achieve that cute bunny face. Plus, the fluffy cake base and creamy frosting are simply irresistible, creating a delightful flavor combination that will have everyone asking for seconds. Prepare for smiles all around!
Easy Bunny Cake Recipe
Spring is a time for renewal, and what better way to celebrate than with a delightful and utterly adorable bunny cake? This recipe is designed for maximum cuteness with minimal fuss, making it perfect for a family baking project or a show-stopping dessert for your Easter gathering. We’re going to transform two simple round cake layers into a whimsical bunny that’s as fun to decorate as it is to eat. So, grab your apron, and let’s get hopping!
Ingredients:
Preparing Your Bunny Canvas
The foundation of our adorable bunny is two perfectly baked and cooled round cake layers. It’s crucial that the cakes are entirely cool before you even think about frosting. If they’re still warm, your frosting will melt into a gooey mess, and we want sharp, defined bunny features! If you’re using a cake mix, follow the package instructions. If you’re a homemade baker, your go-to vanilla or yellow cake recipe will work beautifully here. Once cooled, place one cake layer on your serving platter or cake board. This will be the body of your bunny.
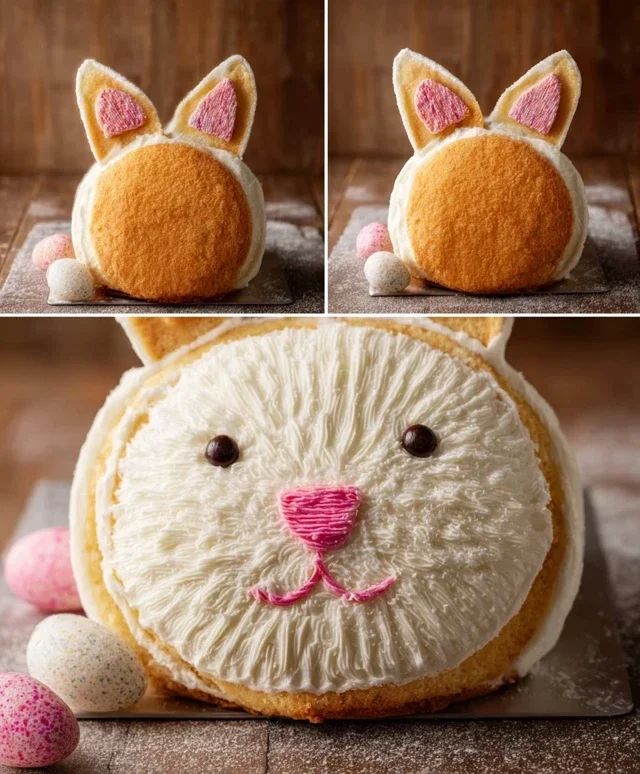
Assembling the Bunny’s Form
Now for the fun part – giving our bunny its shape! We’ll use the second cake layer to create the bunny’s ears. To do this, you’ll need to cut it. Place the second cake layer on a cutting board. With a sharp knife, cut out two ear shapes. You can be creative here; think of elongated ovals or slightly pointed shapes. Aim for shapes that are roughly proportional to the size of your cake layers. Once you have your two ear shapes, carefully place them on top of the first cake layer, so they stand up as bunny ears. You can angle them slightly forward or have them standing tall, depending on your desired bunny expression. Don’t worry about perfection; a slightly whimsical look is part of the charm!
The First Layer of Frosting: A Smooth Foundation
We’re going to start with the white frosting. This will be the main color of our bunny. If you’re using ready-made frosting, give it a good stir to ensure it’s smooth and spreadable. If you’re making your own, ensure it’s at the right consistency for frosting. Generously apply the white frosting to the entire first cake layer (the bunny’s body), making sure to cover the sides and the top completely. Now, carefully frost the two ear pieces you’ve placed on top. The goal here is to create a smooth, even canvas for the rest of our decorating. You can use an offset spatula for this, which makes it much easier to get into all the nooks and crannies. For the ears, spread the frosting smoothly from the base to the tip.
Adding Bunny Details: Ears, Nose, and Eyes
With our bunny’s body and ears covered in white frosting, it’s time to bring it to life! This is where the pink frosting comes in. If you’re tinting your own white frosting, add a few drops of pink gel food coloring at a time, stirring until you achieve a soft, delicate pink hue. Put this pink frosting into a piping bag fitted with a small round tip.
First, let’s add the inner part of the bunny’s ears. Carefully pipe a smaller, elongated shape onto the center of each white frosted ear. This creates the illusion of the inner ear. Next, it’s time for the nose. Using your pink frosting, pipe a small oval or a slightly triangular shape in the center of the bunny’s face.
Now, grab your chocolate icing or melted chocolate. If you’re using melted chocolate, make sure it’s cooled slightly so it doesn’t melt the frosting. Transfer this to a piping bag fitted with a very fine tip, or use a toothpick if you don’t have a piping bag. We’re going to draw the eyes and whiskers. For the eyes, pipe two small dots or oval shapes above and slightly to the sides of the nose. For the whiskers, draw three delicate lines extending outwards from each side of the nose. Again, don’t aim for absolute perfection; slightly imperfect lines add to the handmade charm.
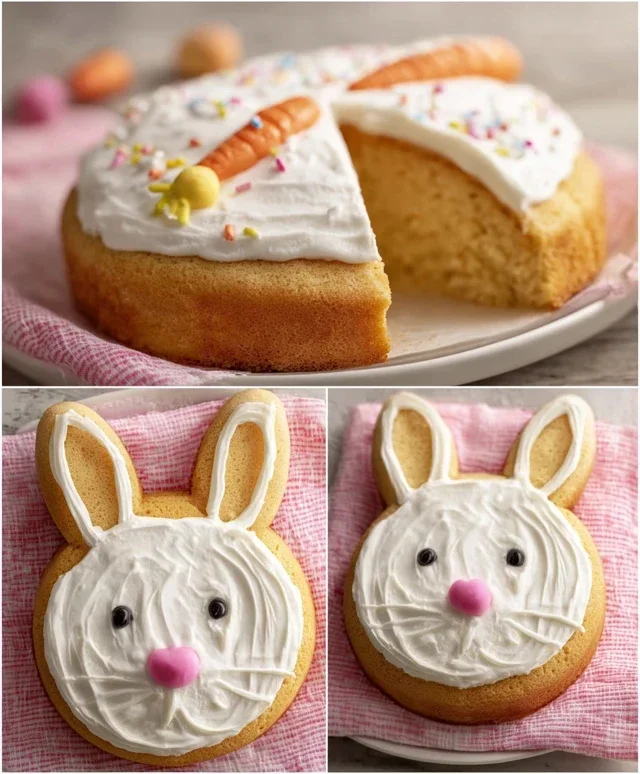
Festive Touches and Finishing Flourishes
Our bunny is looking pretty adorable already, but we can add a few more festive touches! Grab your jellybeans or colorful round candies. These are perfect for adding rosy cheeks to your bunny. Place two jellybeans slightly below and to the sides of the eyes. You can also scatter a few extra jellybeans around the base of the cake for a festive presentation. If you have any extra white frosting, you can use a star tip to pipe a few decorative swirls around the base of the cake, or even add a fluffy tail to the back of the bunny if you’re feeling ambitious! Let your creativity guide you. This bunny cake is all about bringin extractg a smile to your face and the faces of those you share it with. Once all the decorating is complete, allow the frosting to set slightly before slicing and serving this delightful creation. Enjoy your adorable and delicious Easter bunny!
Conclusion:
And there you have it – your very own Easy Bunny Cake Recipe! This delightful treat is perfect for Easter, spring celebrations, or anytime you want to add a touch of whimsical fun to your dessert table. The beauty of this recipe lies in its simplicity; it uses common pantry staples and requires minimal decorating skills, making it accessible for bakers of all levels. The soft, moist cake paired with a sweet frosting is sure to be a crowd-pleaser.
Serve your adorable bunny cake as the centerpiece of your Easter brunch, or as a sweet ending to any spring gathering. It pairs wonderfully with fresh fruit or a scoop of vanilla ice cream. For variations, consider using different food colorings for the frosting to create a whole family of bunnies, or experiment with adding sprinkles to the batter for an extra festive touch. Don’t hesitate to get creative with edible decorations like candy eyes or mini chocolate chips for the nose!
I truly encourage you to give this Easy Bunny Cake Recipe a try. It’s a rewarding and fun baking experience that delivers a show-stopping dessert without the fuss. Happy baking!
Frequently Asked Questions:
Can I make this cake ahead of time?
Yes, absolutely! You can bake the cake layers up to two days in advance and store them tightly wrapped at room temperature. Frosting can also be made a day ahead and refrigerated; let it soften slightly before using.
What other decorations can I use?
The possibilities are endless! Beyond the basic frosting, consider using coconut flakes for a fluffy tail, jelly beans for colorful eyes, or even edible glitter for a touch of sparkle. You can also use different colored frostings to give your bunnies unique outfits!
Is this recipe good for begin extractners?
This Easy Bunny Cake Recipe is designed with begin extractners in mind! The steps are straightforward, and the decorating is forgiving, making it a fantastic option for anyone new to baking or looking for a simple yet impressive dessert.
Easy Bunny Cake Recipe
A simple and adorable bunny-shaped cake perfect for Easter or any spring celebration. This recipe uses convenient store-bought cake mixes and frostings for a quick assembly.
Ingredients
-
Two round cake layers (use one cake mix or your favorite homemade recipe)
-
White frosting (ready-made or your favorite homemade recipe)
-
Pink frosting (or use pink gel food coloring on white frosting)
-
Chocolate icing or melted chocolate for details
-
Jellybeans or colorful round candies
-
Piping bags
Instructions
-
Step 1
Bake two round cake layers according to your chosen recipe or cake mix instructions. Let them cool completely. -
Step 2
Place one cake layer on your serving platter. Frost the top with white frosting. -
Step 3
Place the second cake layer on top of the first. Frost the entire cake (top and sides) with white frosting. -
Step 4
Shape the ears: Cut out two ear shapes from the remaining cake scraps or use fondant. Alternatively, cut two large semi-circles from the edges of one cake layer before frosting. Frost the ears pink. Attach them to the top of the cake. -
Step 5
Use chocolate icing or melted chocolate to pipe eyes, a nose, and a mouth for the bunny on the front of the cake. -
Step 6
Decorate the bunny’s cheeks with jellybeans or colorful round candies.
Important Information
Nutrition Facts (Per Serving)
It is important to consider this information as approximate and not to use it as definitive health advice.
Allergy Information
Please check ingredients for potential allergens and consult a health professional if in doubt.