Easy No Bake Patriotic Cheesecake Recipe
No Bake Patriotic Cheesecake is the ultimate crowd-pleaser for any celebration, especially when the red, white, and blue are on full display! Imagin extracte this: a creamy, dreamy, no-bake cheesecake base, layered with vibrant fruit and a touch of whipped cream, all coming together in a stunning patriotic swirl. It’s the kind of dessert that makes everyone’s eyes light up. Why do we all adore this particular No Bake Patriotic Cheesecake? Because it’s incredibly easy to assemble, meaning less time in the kitchen and more time enjoying the festivities. Plus, its beautiful presentation makes it the star of any picnic, barbecue, or Fourth of July gathering. This no-bake wonder is so special because it delivers all the rich, satisfying flavor of traditional cheesecake without the fuss of baking, making it perfect for even novice bakers. Get ready to impress your guests with this delightfully simple yet show-stopping dessert!
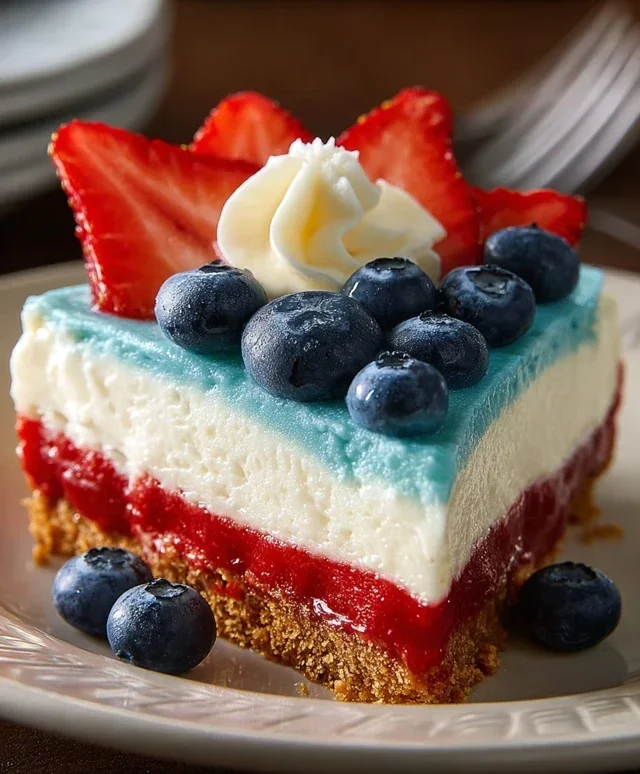
No Bake Patriotic Cheesecake
Get ready to celebrate in style with this show-stopping No Bake Patriotic Cheesecake! It’s the perfect dessert for any summer gathering, from Memorial Day barbecues to Fourth of July fireworks. This cheesecake is not only visually stunning with its vibrant red, white, and blue layers, but it’s also incredibly easy to make. The best part? No oven required! This means less fuss and more time to enjoy the festivities. We’ll be layering a crisp, sweet crust with a creamy, dreamy cheesecake filling, all topped off with a luscious berry topping that screams “America the Beautiful.” This recipe is designed for simplicity and maximum impact, ensuring everyone will be asking for the secret.
Ingredients:
Crust Preparation
First, let’s get our crust ready. In a medium bowl, combine the golden Oreo crum extractbs, melted butter, and a pinch of salt. I like to use a fork to really mix the butter into the crum extractbs, ensuring every speck is coated. This creates a wonderfully crum extractbly yet cohesive base. Once it’s well combined, press this mixture evenly into the bottom of a 9-inch springform pan. I find using the bottom of a glass or a flat measuring cup helps to create a firm, even layer. Make sure to press it up the sides just a little bit if you prefer a slight edge to your crust. Once pressed, place the springform pan in the freezer for at least 15 minutes while we prepare the cheesecake filling. This chilling step is crucial for a firm crust that won’t crum extractble when you slice into the finished dessert.
Creamy White Cheesecake Layer
-
2 cups golden Oreo crumbs
-
3 tablespoons butter, melted
-
1/4 teaspoon salt
-
1 teaspoon red gel food color
-
2 packages (8 oz each) cream cheese, softened
-
2 cups powdered sugar
-
2 teaspoons vanilla extract
-
2 cups heavy whipping cream
-
1 package (3.94 oz) blue raspberry Jell-O
-
1 cup boiling water
-
6 oz cream cheese, softened
-
6 tablespoons butter, softened
-
3 cups powdered sugar
-
1 teaspoon vanilla extract
-
Fresh blueberries
-
Step 1
For the crust, combine golden Oreo crumbs, 3 tablespoons melted butter, and 1/4 teaspoon salt. Press into the bottom of a 9-inch springform pan. -
Step 2
In a large bowl, beat 2 packages softened cream cheese with 2 cups powdered sugar and 2 teaspoons vanilla extract until smooth. -
Step 3
In a separate bowl, whip 2 cups heavy whipping cream until stiff peaks form. Gently fold into the cream cheese mixture. -
Step 4
Divide the cream cheese mixture into two portions. Tint one portion with red gel food coloring. Tint the second portion by dissolving 1 package blue raspberry Jell-O in 1 cup boiling water, then adding to this portion of the cream cheese mixture. The remaining portion will be white. -
Step 5
Spoon dollops of the red, white, and blue mixtures alternately over the crust. Swirl gently with a knife for a marbled effect. -
Step 6
Chill for at least 4 hours, or until firm. -
Step 7
For the frosting, beat 6 oz softened cream cheese with 6 tablespoons softened butter until smooth. Gradually beat in 3 cups powdered sugar and 1 teaspoon vanilla extract until creamy. -
Step 8
Spread the frosting over the chilled cheesecake. Decorate with fresh blueberries.
Now for the star of the show – the creamy white cheesecake filling! In a large bowl, beat the 2 packages of softened cream cheese until it’s completely smooth and free of lumps. This is important for a velvety texture. Next, gradually add the powdered sugar, mixing until it’s well incorporated and the mixture is light and fluffy. Don’t rush this step; it helps to create that wonderfully smooth consistency. Stir in the vanilla extract. In a separate, chilled bowl, whip the heavy whipping cream until stiff peaks form. Be careful not to over-whip, or you’ll end up with butter! Gently fold the whipped cream into the cream cheese mixture. Folding is key here – we want to maintain that airy texture. This will create a beautiful, light, and creamy white layer that will be the base of our patriotic masterpiece.
Red and Blue Swirls of Deliciousness
To create our patriotic swirls, we’ll divide the white cheesecake filling into two portions. Take about one-third of the white filling and place it in a separate bowl. To this smaller portion, add the red gel food coloring and gently stir until you achieve a vibrant red hue. Be mindful that gel food coloring is very concentrated, so start with a little and add more if needed to reach your desired color intensity. Now, for the blue, prepare the blue raspberry Jell-O according to the package directions, but use only 1 cup of boiling water instead of the full amount. This will result in a thicker, more concentrated Jell-O mixture. Let it cool slightly. Once cooled, carefully spoon dollops of the red cheesecake mixture and the blue Jell-O mixture alternately over the white cheesecake filling in the springform pan. Don’t be afraid to get creative with the placement. You can use a toothpick or a skewer to gently swirl the colors together, creating a beautiful, marbled effect. Don’t over-swirl, or the colors will blend too much. Aim for distinct streaks and pockets of red and blue.
Creating the Second Cream Cheese Layer and Frosting
While our first layer begin extracts to set, we’ll prepare the second creamy layer, which will form the base for our frosting. In a medium bowl, beat the 6 oz of softened cream cheese until smooth. Then, add the softened butter and beat until well combined and creamy. Gradually incorporate the 3 cups of powdered sugar, mixing until the frosting is smooth and spreadable. Stir in the vanilla extract. This frosting will be rich and decadent, providing a delightful contrast to the lighter cheesecake layers. Once the first cheesecake layer has firmed up enough to support another layer (about 1-2 hours in the refrigerator, or until it’s no longer jiggly), carefully spread this second cream cheese frosting evenly over the top of the red and blue swirls. Ensure it creates a smooth, even surface, as this will be the base for our final decorative touches.
Decorating with Fresh Blueberries
The final flourish! Now it’s time to make our cheesecake truly patriotic. Arrange the fresh blueberries artfully over the top of the cream cheese frosting. You can create stripes, a star pattern, or simply scatter them for a beautiful, natural look. The deep blue of the blueberries will complement the red and white layers beautifully, creating a stunning visual representation of the American flag. Once decorated, cover the cheesecake loosely with plastic wrap and refrigerate for at least 4-6 hours, or preferably overnight, to allow the cheesecake to fully set. This resting period is essential for achieving the perfect sliceable consistency. When ready to serve, carefully run a knife around the edge of the springform pan before releasing the sides. Slice and enjoy this incredibly delicious and festive no-bake patriotic cheesecake! It’s a guaranteed crowd-pleaser and a delightful way to add a touch of homemade charm to any celebration.

Conclusion:
There you have it – a show-stopping, incredibly easy No Bake Patriotic Cheesecake that’s perfect for any celebration! This recipe is fantastic because it requires zero oven time, making it a stress-free dessert, especially during busy holidays. The creamy, decadent filling paired with the vibrant red, white, and blue toppings creates a visually stunning and deliciously refreshing treat that’s sure to be a crowd-pleaser. It’s the perfect way to add a patriotic flair to your gatherings without breaking a sweat.
For serving, I love to present this No Bake Patriotic Cheesecake directly from the springform pan, showcasing the beautiful layers. Alternatively, you can slice it and serve individual portions on dessert plates, perhaps with a dollop of whipped cream and a few extra berries on the side. If you’re feeling adventurous, consider variations! You could swap the grabeef ham cracker crust for a crushed vanilla cookie crust or even a shortbread base. For a different flavor profile, a hint of lemon zest in the cream cheese filling adds a lovely brightness. Don’t be afraid to get creative with your toppings too – fresh blueberries, sliced strawberries, raspberries, or even some edible star sprinkles can elevate the patriotic theme even further.
I truly encourage you to give this recipe a try. It’s so rewarding to whip up something so impressive with minimal effort. You’ll be so proud of the beautiful and delicious dessert you create!
Frequently Asked Questions:
Q: Can I make this No Bake Patriotic Cheesecake ahead of time?
Absolutely! This cheesecake is actually best made ahead. Chilling allows the flavors to meld and the cheesecake to set up perfectly. I recommend making it at least 4-6 hours in advance, or even the day before your event.
Q: What if I don’t have a springform pan?
No problem! You can adapt this recipe to be made in a regular pie plate. Just press the grabeef ham cracker crust into the bottom and up the sides of the pie plate. You’ll need to slice it carefully to serve, as it won’t release as cleanly as from a springform pan.
No Bake Patriotic Cheesecake
A festive and easy no-bake cheesecake layered with patriotic colors and topped with fresh blueberries.
Ingredients
Instructions
Important Information
Nutrition Facts (Per Serving)
It is important to consider this information as approximate and not to use it as definitive health advice.
Allergy Information
Please check ingredients for potential allergens and consult a health professional if in doubt.