Easy No-Bake Mint Chocolate Chip Cheesecake Recipe
No Bake Mint Chocolate Chip Cheesecake. Imagin extracte a dessert that’s as refreshing as a cool breeze on a summer day, yet decadent enough to satisfy any chocolate craving. That’s exactly what this delightful creation offers! It’s a dream come true for anyone who adores the classic pairing of mint and chocolate, elevated into a creamy, dreamy cheesecake experience. What makes our No Bake Mint Chocolate Chip Cheesecake so incredibly special is its effortless elegance. No oven required means less fuss and more time to savor the moment. The velvety smooth texture, the invigorating burst of mint, and the delightful crunch of chocolate chips all come together in perfect harmony. It’s the kind of dessert that disappears in minutes, leaving everyone asking for the recipe for this amazing No Bake Mint Chocolate Chip Cheesecake.
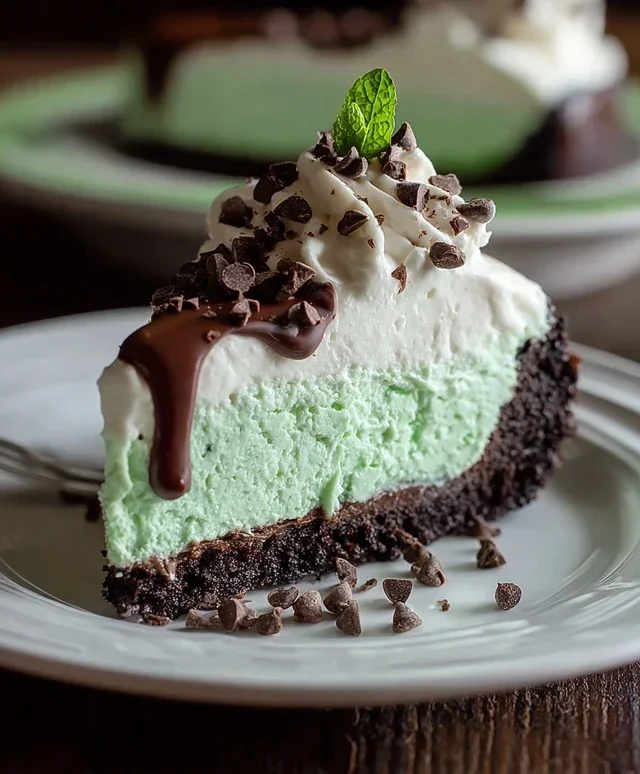
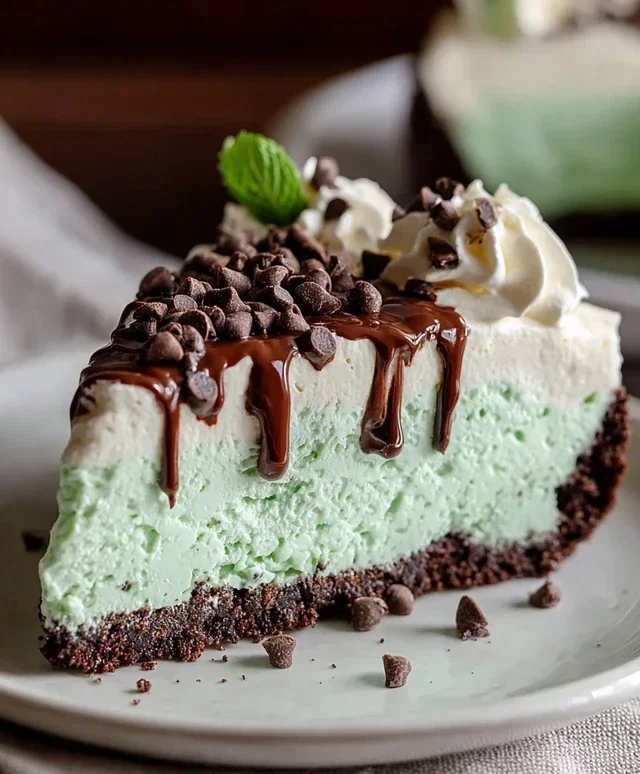
No Bake Mint Chocolate Chip Cheesecake
This No Bake Mint Chocolate Chip Cheesecake is a dream come true for any dessert lover! Imagin extracte a silky smooth, creamy cheesecake bursting with refreshing mint flavor and delightful little chocolate chips, all nestled on a decadent Oreo crust. The best part? You don’t even need to turn on your oven! This recipe is incredibly easy to make, making it perfect for a quick treat, a potluck, or when you’re just craving something sweet and impressive without the fuss. The vibrant green color adds a festive touch, making it a showstopper for any occasion. Let’s dive into creating this irresistible dessert!
Ingredients:
Crust Preparation
The foundation of our delightful cheesecake begin extracts with a classic Oreo crust. The deep, chocolatey flavor of the Oreos perfectly complements the cool mint and creamy cheesecake filling. To start, take all 30 of your whole Oreo cookies. Yes, that means the cookies and the cream filling inside! We want all that deliciousness in our crust. Place the entire cookies into a food processor. Pulse them until they are finely crushed into crum extractbs. If you don’t have a food processor, you can place the Oreos in a large zip-top bag and then crush them with a rolling pin until they resemble fine crum extractbs. It’s important to get them as fine as possible for a cohesive crust.
Once your Oreos are crum extractbed, transfer them to a medium-sized bowl. Add the 7 tablespoons of melted unsalted butter to the crum extractbs. Stir this mixture thoroughly with a fork or a spatula until all the crum extractbs are evenly moistened by the butter. It should look like wet sand. Now, take a 9-inch springform pan. This type of pan is ideal because it allows you to easily release the cheesecake once it’s set. Pour the Oreo crum extractb mixture into the bottom of the springform pan. Using the bottom of a measuring cup or a flat-bottomed glass, press the crum extractbs down firmly and evenly across the entire base of the pan. This step is crucial for a crust that holds its shape and doesn’t crum extractble when you slice into the cheesecake. Make sure to press up the sides slightly as well, if you desire a more defined edge. Place the prepared crust into the refrigerator to chill and firm up while you prepare the cheesecake filling. This chilling time helps the crust set properly.
Cheesecake Filling Creation
Now for the star of the show: the no-bake cheesecake filling! In a large mixing bowl, combine the 24 ounces of softened cream cheese, 1/2 cup of granulated sugar, and 3/4 cup of powdered sugar. It’s really important that your cream cheese is softened to room temperature. This ensures a smooth, lump-free filling. If it’s too cold, you’ll end up with little pockets of cream cheese. You can speed up softening by cutting the cream cheese into smaller cubes.
Using an electric mixer (either a stand mixer with the paddle attachment or a hand mixer), beat these ingredients together on medium speed until they are well combined and incredibly smooth. Scrape down the sides of the bowl frequently to make sure everything is incorporated. Next, add the 1 teaspoon of vanilla extract and the 1/4 teaspoon of peppermint extract. If you’re a big mint lover, feel free to add a tiny bit more peppermint extract, tasting as you go to find your perfect level of minty freshness. Be careful not to overdo it, as it can become overpowering. Beat again until just combined.
Whipping Cream and Color Infusion
In a separate, clean bowl, whip the 1 1/4 cups of heavy whipping cream. You can use your electric mixer for this as well, but make sure the beaters are clean and dry. Beat the heavy cream on medium-high speed until stiff peaks form. Stiff peaks mean that when you lift the beaters, the cream stands up straight without drooping. Be careful not to over-whip, or you’ll end up with butter!
Now comes the fun part – coloring! Gently fold about half of the whipped cream into the cream cheese mixture. Use a spatula and a gentle folding motion to combine. This lightens the cream cheese base and makes it easier to incorporate the rest of the whipped cream. Add your green gel food coloring a little at a time, folding it in until you achieve your desired shade of minty green. Gel food coloring is more potent than liquid, so a little goes a long way. Once you’re happy with the color, gently fold in the remaining whipped cream until no white streaks remain. Again, fold gently to keep the filling light and airy.
Incorporating the Chocolate Chips
Finally, it’s time to add those delicious chocolate chips! Gently fold in the 1/2 cup of mini chocolate chips. These little bursts of chocolate are what make this cheesecake so irresistible. You want to distribute them evenly throughout the filling, but avoid overmixing, as we want to keep the filling as airy as possible. If you like, you can reserve a few extra mini chocolate chips to sprinkle on top of the cheesecake once it’s poured into the pan for an extra decorative touch.
Assembly and Chilling
Retrieve the chilled Oreo crust from the refrigerator. Spoon the mint chocolate chip cheesecake filling evenly over the crust. Use your spatula to smooth the top. If you reserved any extra chocolate chips, sprinkle them on top now. Cover the springform pan tightly with plastic wrap. It’s important to prevent any odors from the refrigerator from getting into the cheesecake. Place the cheesecake in the refrigerator to chill and set for at least 6 hours, but overnight is even better. This extended chilling time allows the cheesecake to firm up beautifully, creating that perfect sliceable texture.
Once the cheesecake is fully set, carefully release the sides of the springform pan. You can run a thin knife around the edge before releasing the springform to ensure a clean release. Slice and serve this delightful No Bake Mint Chocolate Chip Cheesecake chilled. It’s wonderful on its own, or you can serve it with a dollop of whipped cream and a few extra chocolate chips. Enjoy every creamy, minty, chocolaty bite!
Conclusion:
And there you have it – a ridiculously easy and utterly delicious No Bake Mint Chocolate Chip Cheesecake! This recipe truly shines because it delivers all the rich, creamy, minty goodness of a traditional cheesecake without any of the fuss or waiting time. It’s the perfect dessert for when you’re craving something special but don’t want to spend hours in the kitchen. The cool mint perfectly complements the sweet chocolate chips, creating a flavor explosion that’s universally loved. I really encourage you to give this fantastic recipe a try; it’s a guaranteed crowd-pleaser!
For serving, this No Bake Mint Chocolate Chip Cheesecake is wonderful all on its own, perhaps with a light dusting of extra chocolate chips or a sprig of fresh mint for garnish. It also pairs beautifully with a drizzle of chocolate sauce or a dollop of whipped cream. If you’re feeling adventurous, consider adding a layer of crushed chocolate cookies to the bottom crust for an extra textural element, or even swirling in some green food coloring for a more vibrant look.
Frequently Asked Questions:
Can I make this cheesecake ahead of time?
Absolutely! This no-bake wonder is actually best made ahead. I like to prepare it at least 4-6 hours in advance, or even the day before, to allow it to set up completely and for the flavors to meld beautifully. It will keep well in the refrigerator for up to 3 days.
What kind of chocolate chips work best?
I personally love using mini semi-sweet chocolate chips because they distribute evenly throughout the cheesecake. However, you can also use regular semi-sweet, milk chocolate, or even dark chocolate chips depending on your preference. For an extra minty kick, try adding a few mini mint chocolate chips too!
What if I don’t have cream cheese? Can I substitute it?
Cream cheese is pretty essential for the classic cheesecake texture and flavor. While some recipes might suggest alternatives for baked cheesecakes, for this specific no-bake version, I wouldn’t recommend a direct substitute as it will significantly alter the outcome and likely won’t set properly. Stick to full-fat block cream cheese for the best results.
No Bake Mint Chocolate Chip Cheesecake
A refreshing and easy no-bake cheesecake bursting with mint and chocolate chip flavors, perfect for any occasion.
Ingredients
-
30 Oreo cookies, whole
-
7 tablespoons unsalted butter, melted
-
24 ounces cream cheese, softened (3 packages)
-
1/2 cup granulated sugar
-
3/4 cup powdered sugar
-
1 teaspoon vanilla extract
-
1/4 teaspoon peppermint extract (or more to taste)
-
1 1/4 cups heavy whipping cream
-
Green gel food coloring, as needed
-
1/2 cup mini chocolate chips, plus extra for topping if desired
Instructions
-
Step 1
Crush Oreo cookies into fine crumbs. Mix with melted butter until well combined. Press the mixture evenly into the bottom of a 9-inch springform pan. -
Step 2
In a large bowl, beat the softened cream cheese until smooth. Gradually add granulated sugar and powdered sugar, beating until well combined and no lumps remain. -
Step 3
Stir in vanilla extract and peppermint extract. Add green gel food coloring a few drops at a time until desired shade of green is achieved. -
Step 4
In a separate bowl, whip the heavy whipping cream until stiff peaks form. Gently fold the whipped cream into the cream cheese mixture until just combined. -
Step 5
Fold in the mini chocolate chips. Pour the cheesecake filling over the Oreo crust and spread evenly. -
Step 6
Cover the cheesecake and refrigerate for at least 6 hours, or until firm. Garnish with extra chocolate chips if desired before serving.
Important Information
Nutrition Facts (Per Serving)
It is important to consider this information as approximate and not to use it as definitive health advice.
Allergy Information
Please check ingredients for potential allergens and consult a health professional if in doubt.