Easy Easter Jello-O Pie Recipe – Sweet Holiday Treat
Easter Jello-O Pie is more than just a dessert; it’s a vibrant burst of nostalgic joy that captures the spirit of spring! This delightful creation, with its shimmering colors and playful texture, has been a beloved centerpiece at Easter gatherings for generations. What is it about this simple yet spectacular Easter Jello-O Pie that makes us all so giddy? Perhaps it’s the impossibly smooth, jiggly layers that practically beg to be devoured, or the way it instantly transports us back to childhood Easters filled with egg hunts and sugary delights. It’s the perfect balance of tart fruit flavors and creamy sweetness, all nestled within a crisp, buttery crust. This Easter Jello-O Pie is incredibly easy to make, making it a stress-free way to add a festive and fun flair to your holiday table.
Easter Jello-O Pie
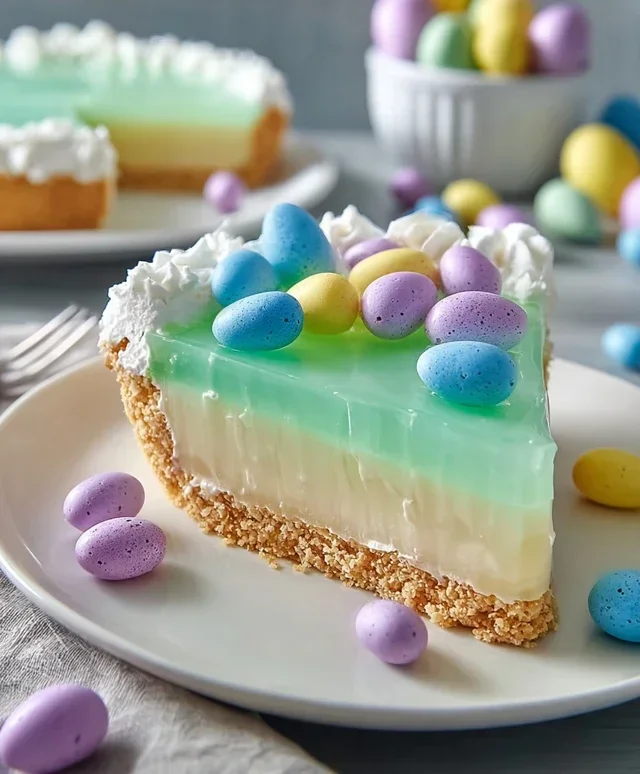
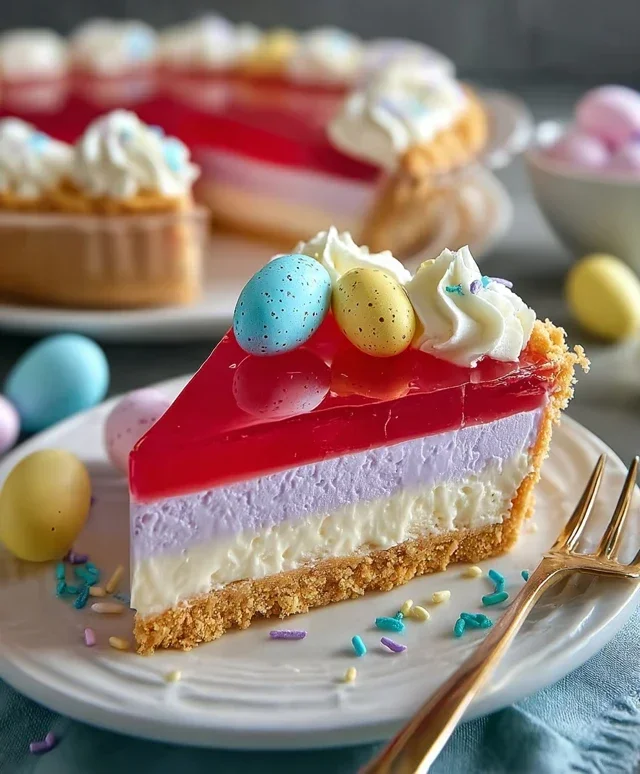
Get ready to create a dessert that’s as vibrant and joyful as Easter itself! This Easter Jello-O Pie is a delightful, no-bake treat that’s surprisingly easy to make and always a crowd-pleaser. Imagin extracte layers of fruity Jell-O suspended in a creamy, dreamy whipped cream filling, all nestled in a crisp, buttery grabeef ham cracker crust. It’s a perfect centerpiece for your Easter brunch or a fun activity to make with the kids. The beauty of this pie lies in its simplicity and the endless possibilities for customization. We’re going to use a combination of four fantastic Jell-O flavors to create a stunning rainbow effect, but feel free to swap them out for your family’s favorites. Let’s dive into creating this sweet sensation!
Ingredients:
Crafting the Perfect Crust
The foundation of any great pie is its crust, and this one is no exception. We’ll be making a simple yet delicious grabeef ham cracker crust that provides a wonderful contrast to the soft Jell-O filling.
1. Prepare the Grabeef ham Cracker Crum extractbs: You can either buy pre-crushed grabeef ham cracker crum extractbs or crush them yourself. If crushing them, place about 10-12 full grabeef ham cracker sheets into a food processor and pulse until you have fine crum extractbs. Alternatively, place them in a resealable plastic bag and crush them with a rolling pin. You’ll need approximately 2½ cups of crum extractbs.
2. Melt the Butter: In a microwave-safe bowl or in a small saucepan over low heat, melt the 12 tablespoons (1 ½ sticks) of butter. Be careful not to let it brown.
3. Combine and Press: In a medium bowl, combine the grabeef ham cracker crum extractbs and the melted butter. Stir until all the crum extractbs are moistened and the mixture resembles wet sand. This ensures the crust holds together well. Press this mixture firmly and evenly into the bottom and up the sides of a 9-inch pie plate. Using the bottom of a measuring cup or a flat-bottomed glass can help you get a nice, compact layer. Once pressed, place the pie plate in the freezer for about 10-15 minutes while you prepare the Jell-O layers. This chilling helps the crust firm up and prevents it from crum extractbling when you add the filling.
Layering the Rainbow
Now for the fun part – creating those beautiful Jell-O layers! We’ll be working with each color individually to achieve distinct layers. This process requires a little patience, but the stunning visual result is absolutely worth it.
4. Prepare the First Jell-O Layer: In a heatproof bowl, combine the ½ package (a little under 2 ounces) of Pink Starburst Jell-O with ¾ cup of boiling water. Stir vigorously until the Jell-O is completely dissolved. This is crucial for a smooth texture; any undissolved granules will make your pie grainy. If you want an even more intense pink color, you can add a drop or two of pink food dye at this stage. Once dissolved, stir in ½ cup of cold water. Pour about a third of this pink Jell-O mixture into your chilled grabeef ham cracker crust. Place the pie carefully back into the refrigerator to set for about 20-30 minutes, or until it’s firm to the touch but not completely solid. This partial setting is key to preventing the layers from bleeding into each other.
5. Continue with Subsequent Layers: While the first layer is setting, prepare the next Jell-O flavor. In separate heatproof bowls, dissolve the 1½ ounces of Blue Jell-O, 1½ ounces of Yellow Jell-O, and 1½ ounces of Purple Jell-O, each with ¾ cup of boiling water and then ½ cup of cold water, respectively. You can optionally add yellow food dye to the yellow Jell-O for a brighter hue. Once the first pink layer is firm, gently pour another third of the blue Jell-O mixture over it. Return the pie to the refrigerator to set for another 20-30 minutes. Repeat this process with the yellow Jell-O and then the purple Jell-O, allowing each layer to partially set before adding the next. The goal is to build those distinct color bands.
The Creamy Cloud Topping
To transform our Jell-O layers into a true pie, we’ll add a luscious whipped cream topping. This adds a delightful richness and a beautiful contrast to the translucent Jell-O.
6. Whip the Cream: In a large, chilled bowl, whip the 16 ounces of whipped cream (you can use store-bought whipped topping or heavy cream that you whip yourself) until it forms stiff peaks. If using heavy cream, you’ll typically need to add a tablespoon or two of powdered sugar and a touch of vanilla extract for flavor. Be careful not to overmix, or it can become grainy.
7. Assemble the Pie: Once all the Jell-O layers have been added and have at least partially set (they don’t need to be completely solid at this point, as the whipped cream will help them firm up), gently spread the whipped cream evenly over the top of the last Jell-O layer. You can create swirls and peaks for a more decorative finish.
8. Chill to Perfection: Cover the pie loosely with plastic wrap and refrigerate for at least 4 hours, or preferably overnight, to allow the Jell-O to fully set and the flavors to meld. This is the most important step for ensuring a firm pie that slices beautifully.
When it’s time to serve, carefully slice the Easter Jell-O Pie with a sharp knife, revealing the beautiful rainbow layers within. Enjoy this festive and delicious dessert!
Conclusion:
And there you have it – a delightful and incredibly easy Easter Jello-O Pie recipe that’s sure to become a springtime favorite! This pie is a winner because it’s bursting with fruity flavor, wonderfully refreshing, and requires minimal effort, making it perfect for busy holiday preparations. Its vibrant colors also make it a show-stopping centerpiece for your Easter dessert table. We love serving it chilled, perhaps with a dollop of whipped cream or a scattering of fresh berries for an extra touch of elegance. Don’t be afraid to get creative with the Jello-O flavors – consider a tropical twist with pineapple and mango, or a berry medley for a different flavor profile. The possibilities are endless!
We truly hope you’ll give this Easter Jello-O Pie a try this year. It’s a simple yet impressive dessert that’s guaranteed to bring smiles to everyone’s faces. Happy baking, and a very Happy Easter!
Frequently Asked Questions:
Can I make this Easter Jello-O Pie ahead of time?
Absolutely! This pie is an excellent make-ahead dessert. It’s best to prepare it at least 4-6 hours in advance, or even the day before, to allow it to fully set and chill. This gives you more time to enjoy your Easter celebrations without worrying about last-minute dessert prep.
What are some non-dairy serving suggestions for this pie?
If you need dairy-free options, you can easily enjoy this Easter Jello-O Pie as is, or top it with coconut whipped cream. Many brands offer delicious vegan whipped toppings that are perfect for a dairy-free garnish.
How can I make the crust more festive?
For a more festive crust, you can mix in some colorful sprinkles with your grabeef ham cracker crum extractbs before pressing them into the pie plate. Alternatively, you could use crushed pastel-colored cookies for a unique and visually appealing base.
Easter Jell-O Pie
A vibrant and festive Jell-O pie perfect for Easter celebrations, featuring layers of colorful Jell-O and a creamy whipped topping on a buttery graham cracker crust.
Ingredients
-
2½ cups Graham cracker crumbs
-
12 tbsp Butter, melted
-
½ package Pink Jell-O (a little under 2 ounces)
-
½ package Blue Jell-O (1½ ounces)
-
½ package Yellow Jell-O (1½ ounces)
-
½ package Purple Jell-O (1½ ounces)
-
3 cups Boiling Water, divided
-
1⅓ cup Cold Water, divided
-
16 ounces Whipped Cream, divided
-
Yellow Food Dye (optional)
-
Pink Food Dye (optional)
Instructions
-
Step 1
Combine graham cracker crumbs and melted butter. Press firmly into the bottom and up the sides of a 9-inch pie plate to form the crust. Chill the crust while preparing the filling. -
Step 2
In separate bowls, dissolve each flavor of Jell-O: Pink Jell-O in ½ cup boiling water and ¼ cup cold water. Blue Jell-O in ½ cup boiling water and ¼ cup cold water. Yellow Jell-O in ½ cup boiling water and ¼ cup cold water. Purple Jell-O in ½ cup boiling water and ¼ cup cold water. Add optional food coloring to enhance vibrancy if desired. -
Step 3
Let each Jell-O mixture cool at room temperature until slightly thickened but not set. This is a crucial step to prevent the colors from bleeding into each other. -
Step 4
Gently fold about 2 ounces of whipped cream into each of the thickened Jell-O mixtures. -
Step 5
Pour the colored Jell-O mixtures into the chilled crust in distinct layers or swirls. Start with one color and allow it to set slightly before adding the next, or carefully pour side-by-side to create a marbled effect. Chill the pie until firm, about 2-3 hours. -
Step 6
Once the Jell-O is set, spread the remaining whipped cream over the top of the pie. -
Step 7
Chill the finished pie for at least 30 minutes before serving.
Important Information
Nutrition Facts (Per Serving)
It is important to consider this information as approximate and not to use it as definitive health advice.
Allergy Information
Please check ingredients for potential allergens and consult a health professional if in doubt.