Cherries in the Snow- Easy Dessert Recipe
Cherries in the Snow isn’t just a dessert; it’s a whispered promise of comfort and a vibrant splash of joy on even the frostiest day. Have you ever craved a taste of pure nostalgia, a treat that feels both incredibly decadent and refreshingly simple? That’s the magic of Cherries in the Snow. It’s the kind of dessert that conjures up cozy evenings and shared smiles, a beloved classic that has graced countless tables for generations. What makes this dish so enduringly popular? It’s the exquisite harmony of tart, juicy cherries suspended in a cloud of impossibly light, creamy sweetness, often topped with a delicate, snowy dusting. This delightful contrast of flavors and textures is what truly sets Cherries in the Snow apart, transforming humble ingredients into an unforgettable experience. Get ready to fall in love all over again with this timeless treat.
Ingredients:
Let’s Make Cherries in the Snow
This dessert, often called “Cherries in the Snow,” is a stunning and incredibly easy dessert that looks as delightful as it tastes. It’s perfect for potlucks, holidays, or just a special treat for your family. The beauty of this recipe lies in its simplicity and the vibrant contrast of the ruby-red cherry filling against the snowy white whipped cream and cake. No complex baking skills are required, just a few straightforward steps to assemble this showstopper.
The base of our dessert is a pre-baked angel food cake. This provides a light and airy foundation that absorbs the flavors beautifully without becoming overly dense. The cream cheese mixture adds a delightful tang and a creamy richness that perfectly complements the sweetness of the cherry filling. And of course, the thawed Cool Whip brings that classic whipped topping texture and a touch of sweetness. Together, these elements create a dessert that’s both refreshing and satisfying.
Preparing the Creamy Layer
The first crucial step in creating our Cherries in the Snow is to prepare the luscious cream cheese mixture. For this, you’ll need your softened cream cheese. Make sure it’s truly at room temperature; this is key to achieving a smooth, lump-free texture. If your cream cheese is still cold, it will be difficult to mix, and you might end up with small, unappealing chunks in your filling. You can speed up softening by unwrapping the cream cheese and placing it on a plate for about 30-60 minutes, or by gently warming it in the microwave for short intervals, being careful not to melt it.
Once your cream cheese is ready, place it in a medium-sized bowl. Add the powdered sugar to the bowl. Using an electric mixer, either a hand mixer or a stand mixer with a whisk attachment, beat the cream cheese and powdered sugar together until they are smooth and well combined. This mixture will become fluffy and pnon-alcoholic ale yellow. Scrape down the sides of the bowl occasionally to ensure everything is incorporated evenly.
Next, gradually pour in the 2% milk while continuing to mix. You want to add the milk slowly to help create a smooth, pourable consistency. Beat until the mixture is completely smooth and all the lumps of cream cheese have disappeared. It should resemble a thick, but still pourable, sauce. This creamy layer is what will give our dessert its characteristic snowy appearance and a delightful tang that balances the sweetness of the cherries.
Assembling the Dessert Layers
Now comes the fun part – assembling our Cherries in the Snow! You’ll need a serving dish, a 9×13 inch baking dish works wonderfully, but any large, attractive dish will do. Begin extract by tearing or slicing your pre-baked angel food cake into bite-sized pieces. You don’t need to be too precise here; rustic chunks are perfectly fine and add to the homemade charm. Arrange these cake pieces evenly in the bottom of your serving dish, creating a solid layer.
Next, gently spoon the thawed Cool Whip over the layer of angel food cake. Spread it out evenly with a spatula, making sure to cover all the cake pieces. This creates our second “snowy” layer. It’s important that the Cool Whip is fully thawed but not melted; you want it to hold its shape.
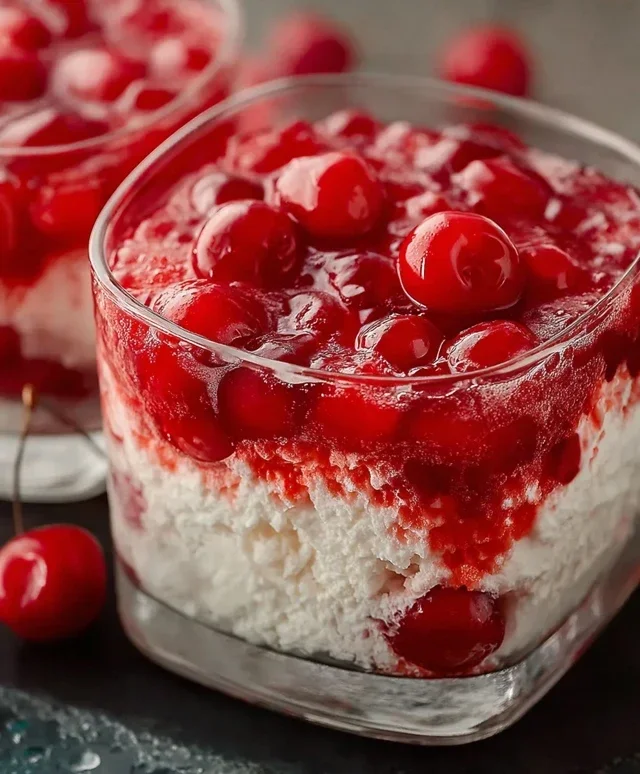
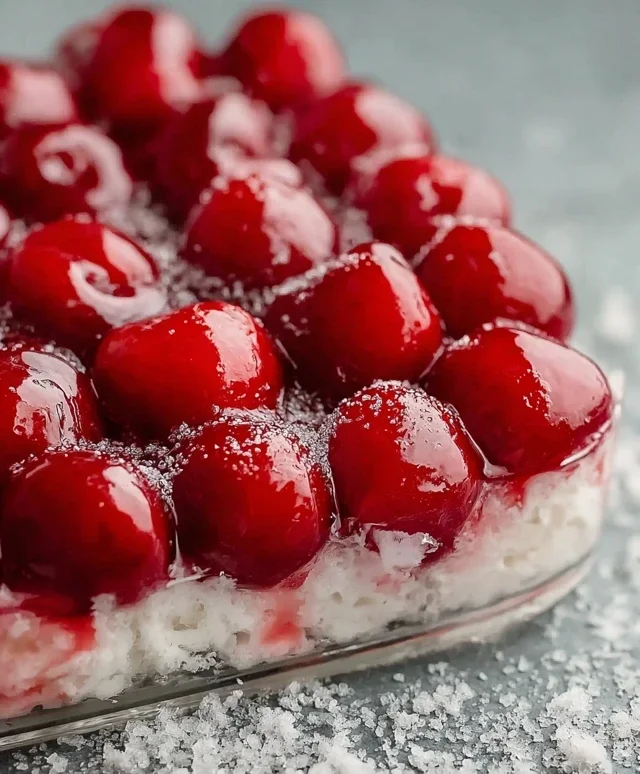
Now, take the two cans of cherry pie filling. Do not drain them. Spoon the cherry pie filling directly over the Cool Whip layer. You can spread it out evenly, or create swirls for a more artistic presentation. The vibrant red of the cherries will immediately contrast beautifully with the white Cool Whip, creating the stunning visual effect that gives this dessert its name.
Finally, take your prepared cream cheese mixture and drizzle it over the cherry layer. Again, you can spread it evenly or create decorative patterns. The goal is to have a generous amount of this creamy, tangy sauce coating the top. This final layer ties all the flavors and textures together beautifully.
Chill and Serve
The final, and perhaps most important, step for achieving the perfect Cherries in the Snow is chilling. Once assembled, cover the dish tightly with plastic wrap. It’s crucial to let the dessert chill in the refrigerator for at least 4 hours, but overnight is even better. This allows all the flavors to meld together and the dessert to set up properly. The chilling process allows the cake to soften slightly from the moisture in the other layers, the cream cheese mixture to firm up a bit, and the overall dessert to become wonderfully cohesive.
When you’re ready to serve, simply uncover the dish and present your masterpiece. The vibrant red cherries, the snowy white Cool Whip, and the creamy drizzle create a visually stunning dessert that will impress your guests. Serve chilled, and enjoy every delicious spoonful of this easy, no-bake delight. It’s a crowd-pleaser for any occasion!
Conclusion:
I hope you’ve enjoyed learning how to create this delightful “Cherries in the Snow” recipe! This dessert is truly a showstopper, offering a perfect balance of tart cherries and a sweet, creamy coconut topping. It’s incredibly versatile and surprisingly simple to make, making it an ideal choice for any occasion, from casual family dinners to more formal gatherings. The vibrant red of the cherries against the pristine white of the coconut is visually stunning, and the flavor combination is simply irresistible. I encourage you to give it a try; you won’t be disappointed!
This treat is fantastic served chilled, making it a refreshing end to a heavy meal or a wonderful standalone dessert. Consider garnishing with a sprig of mint or a few slivered almonds for added texture and visual appeal. For variations, feel free to experiment with different types of berries alongside the cherries, or infuse the coconut milk with a hint of vanilla or almond extract for an extra layer of flavor. You could even add a splash of kirsch extract to the cherry mixture for an adult twist.
Frequently Asked Questions:
Can I use frozen cherries instead of fresh for Cherries in the Snow?
Absolutely! Frozen cherries work wonderfully in this recipe. You’ll want to thaw them completely and drain off any excess liquid before adding them to your dessert. The texture might be slightly softer than fresh, but the flavor will still be fantastic.
What if I don’t have coconut milk? Can I substitute it?
Yes, you can! If you don’t have coconut milk, heavy cream or even evaporated milk can be used as a substitute for the topping. The flavor profile will change slightly, but it will still be a delicious creamy topping. For a dairy-free option besides coconut milk, you could explore a cashew cream.
How long can Cherries in the Snow be stored?
This dessert is best enjoyed within 2-3 days of preparation. Store it covered in the refrigerator. The cherry juices may continue to seep into the topping over time, so the visual separation might lessen, but the taste will remain delightful.
Cherries in the Snow
A delightful no-bake dessert featuring layers of creamy filling, cherry pie topping, and angel food cake.
Ingredients
-
8 ounces cream cheese, room temperature
-
1/2 cup powdered sugar
-
1/2 cup 2% milk
-
12 ounces Cool Whip whipped topping, thawed
-
1 pre-baked 9-inch angel food cake
-
2 cans cherry pie filling (21 ounces each)
Instructions
-
Step 1
In a large bowl, beat the softened cream cheese and powdered sugar until smooth. -
Step 2
Gradually beat in the 2% milk until well combined. -
Step 3
Gently fold in the thawed Cool Whip whipped topping. -
Step 4
Tear the angel food cake into bite-sized pieces and layer half of them in the bottom of a 9×13 inch baking dish. -
Step 5
Spoon half of the cherry pie filling over the cake pieces. -
Step 6
Spread half of the cream cheese mixture evenly over the cherry layer. -
Step 7
Repeat the layers with the remaining cake, cherry pie filling, and cream cheese mixture. -
Step 8
Chill for at least 4 hours, or until firm.
Important Information
Nutrition Facts (Per Serving)
It is important to consider this information as approximate and not to use it as definitive health advice.
Allergy Information
Please check ingredients for potential allergens and consult a health professional if in doubt.