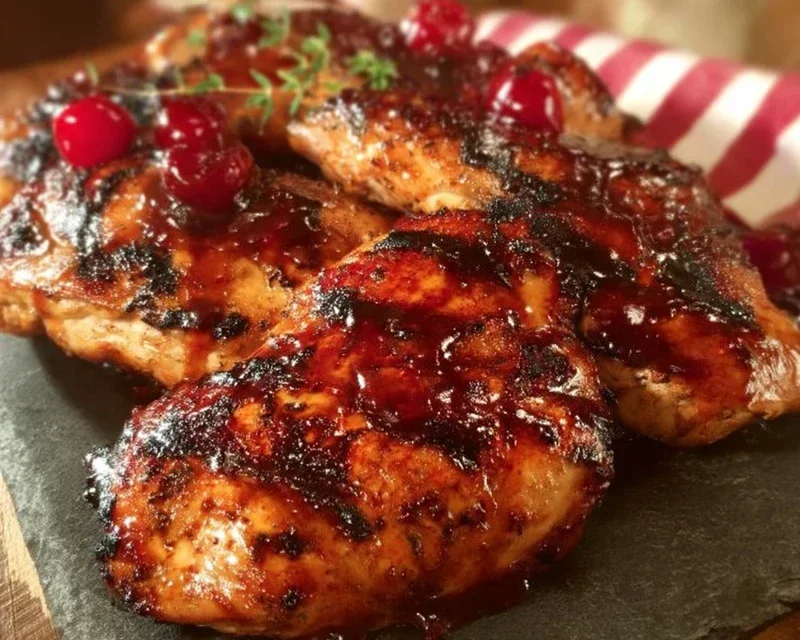
Cherry Dr Pepper Grilled Chicken Recipe
Cherry Dr. Pepper Grilled Chicken is more than just a meal; it’s a summer revelation. If you’re searching for a flavor combination that’s both wildly unexpected and ridiculously delicious, you’ve stumbled upon pure grilling gold. This isn’t your average weeknight chicken. Imagin extracte succulent, perfectly grilled chicken thighs, their juicy interiors infused with the unmistakable sweet-and-tangy notes of cherry and Dr. Pepper. It’s the kind of dish that makes everyone at the barbecue ask, “What IS that amazing flavor?” We love this Cherry Dr. Pepper Grilled Chicken because it’s surprisingly simple to make, yet delivers a complex, deeply satisfying taste experience that’s a guaranteed crowd-pleaser. Get ready to elevate your grilling game with this unforgettable recipe!

Cherry Dr. Pepper Grilled Chicken
There’s something undeniably satisfying about firing up the grill, especially when you know you’re about to create something truly special. Today, we’re diving into a recipe that’s a guaranteed crowd-pleaser and a personal favorite: Cherry Dr. Pepper Grilled Chicken. This isn’t your average grilled chicken. The sweet, tangy, and slightly spicy glaze, infused with the unique flavor of Cherry Dr. Pepper, transforms simple chicken into a culinary masterpiece. It’s perfect for a backyard barbecue, a weeknight dinner with a twist, or whenever you’re craving a burst of delicious flavor. Get ready to impress yourself and your guests with this incredibly easy yet sophisticated dish.
Ingredients:
Crafting the Flavorful Glaze
The magic of this recipe lies in its incredibly simple yet potent glaze. It all starts with combining a few pantry staples with that iconic Cherry Dr. Pepper. This is where the sweet and savory symphony begin extracts.
Step 1: Prepare the Glaze Base
In a medium saucepan, combine the Cherry Dr. Pepper, ketchup, tomato paste, and brown sugar. Stir these ingredients together until they are well incorporated. The brown sugar will start to dissolve into the liquids, creating a beautiful, rich base for our glaze.
Step 2: Infuse with Flavor
Now, it’s time to add the flavor boosters. To the saucepan, add the Worcestershire sauce, onion powder, black pepper, liquid smoke, chili powder, minced garlic, and paprika. Give everything a good stir. The combination of these spices and aromatics will complement the sweetness of the Dr. Pepper and ketchup beautifully, adding depth and complexity.
Step 3: Simmer and Thicken
Place the saucepan over medium heat. Bring the mixture to a gentle simmer, stirring occasionally. Allow it to simmer for about 15-20 minutes, or until the glaze has thickened to your desired consistency. You’re looking for a syrupy texture that will cling nicely to the chicken. This simmering process is crucial as it allows the flavors to meld together and for some of the liquid to evaporate, concentrating the deliciousness. Don’t rush this step; patience here will be rewarded with a superior glaze. If it seems too thick, you can always add a tablespoon or two of water or more Dr. Pepper. If it’s too thin, let it simmer a little longer.
Preparing the Chicken
While your glaze is simmering and developing its incredible flavor, it’s time to get your chicken ready for the grill. We want to ensure every piece is seasoned perfectly to absorb all that goodness.
Step 4: Season the Chicken
Pat your chicken pieces dry with paper towels. This is an important step as it helps the seasoning to adhere better. In a large bowl or on a plate, generously season all sides of the chicken pieces with the seasoning salt and paprika. Ensure each piece is evenly coated. The seasoning salt will provide a foundational savory flavor, while the paprika adds a subtle sweetness and a beautiful reddish hue, especially after grilling.
Grilling to Perfection
Now for the main event! Grilling imparts that wonderful smoky flavor that is simply unmatched, and this glaze will caramelize beautifully under the heat.
Step 5: Grill and Glaze
Preheat your grill to medium-high heat. Once the grill is hot, arrange the seasoned chicken pieces on the grates. Grill the chicken for about 5-7 minutes per side, until it’s starting to develop nice grill marks and is partially cooked through. During the last 10-15 minutes of grilling, begin extract brushing the chicken generously with the prepared Cherry Dr. Pepper glaze. Continue to grill, turning the chicken every few minutes and applying more glaze each time. You want to build up layers of sticky, caramelized glaze. The chicken is done when it reaches an internal temperature of 165 degrees Fahrenheit (74 degrees Celsius) in the thickest part of the meat, and the juices run clear. Be careful not to burn the glaze; if it starts to char too quickly, reduce the grill heat slightly.
Resting and Serving
The final moments before diggin extractg in are just as important for ensuring the juiciest, most flavorful chicken.
Step 6: Rest and Enjoy
Once the chicken is cooked and beautifully glazed, remove it from the grill and place it on a clean platter or cutting board. Tent it loosely with foil and let it rest for at least 5-10 minutes. This resting period allows the juices to redistribute throughout the chicken, resulting in a more tender and moist final product. Serve your delicious Cherry Dr. Pepper Grilled Chicken hot, with extra glaze on the side if desired. This dish pairs wonderfully with classic barbecue sides like potato salad, coleslaw, or grilled corn on the cob. Enjoy the sweet, tangy, and smoky flavors that will have everyone asking for the recipe!
Conclusion:
This Cherry Dr. Pepper Grilled Chicken recipe is a true winner for so many reasons! It’s incredibly easy to whip up, making it perfect for busy weeknights, yet it delivers a burst of unforgettable flavor that will impress at any summer barbecue. The sweet, tangy cherry notes from the Dr. Pepper perfectly complement the savory chicken, creating a tender and juicy result with just the right amount of char from the grill. It’s a fantastic way to elevate your usual grilled chicken to something truly special.
When it comes to serving, this grilled chicken is wonderfully versatile. It’s delicious served alongside classic barbecue staples like corn on the cob, potato salad, or a crisp green salad. For a heartier meal, consider pairing it with rice pilaf or roasted sweet potatoes. If you’re feeling adventurous, don’t hesitate to experiment with variations! You could add a pinch of cayenne pepper to the marinade for a touch of heat, or incorporate a splash of soy sauce for an umami boost. I highly encourage you to give this Cherry Dr. Pepper Grilled Chicken a try – you won’t be disappointed!
Frequently Asked Questions:
Can I make this Cherry Dr. Pepper Grilled Chicken indoors?
Absolutely! While grilling provides the best smoky flavor and char, you can adapt this recipe for the oven. After marinating, you can pan-sear the chicken in a cast-iron skillet over medium-high heat until browned on both sides, then finish it in a preheated oven at 400°F (200°C) until cooked through. Alternatively, you could bake it on a baking sheet at the same temperature.
How long should I marinate the chicken?
For the best flavor, I recommend marinating the chicken for at least 30 minutes, but up to 4 hours in the refrigerator. Anything longer than 4 hours might start to make the chicken too mushy due to the acidity of the Dr. Pepper. Make sure to discard the used marinade after taking the chicken out to grill.
Cherry Dr. Pepper Grilled Chicken
A sweet and smoky grilled chicken recipe featuring a glaze made with Cherry Dr. Pepper, ketchup, brown sugar, and savory spices.
Ingredients
-
1 – 12 oz can Cherry Dr. Pepper
-
1 Cup Ketchup
-
1 – 6 oz. can tomato paste
-
1 Cup Brown Sugar
-
1 Tablespoon Worcestershire sauce
-
1/2 tsp. Onion Powder
-
1/2 tsp. black pepper
-
1/2 tsp. liquid smoke
-
1/2 tsp. Chili Powder
-
1 tsp. minced garlic
-
1 whole chicken cut up OR 1 package of dark meat chicken cut up about 12 pieces of chicken
-
3 teaspoons Seasoning Salt
-
1 tsp Paprika
Instructions
-
Step 1
In a medium saucepan, combine Cherry Dr. Pepper, ketchup, tomato paste, brown sugar, Worcestershire sauce, onion powder, black pepper, liquid smoke, chili powder, minced garlic, seasoning salt, and paprika. -
Step 2
Bring the mixture to a simmer over medium heat, stirring occasionally. Cook for about 15-20 minutes, or until the sauce has thickened to a glaze consistency. -
Step 3
While the glaze is simmering, preheat your grill to medium-high heat. Lightly oil the grill grates. -
Step 4
Season the chicken pieces generously with additional seasoning salt and pepper. -
Step 5
Place the chicken on the preheated grill. Grill for approximately 20-25 minutes, turning occasionally, until the chicken is cooked through and reaches an internal temperature of 165°F (74°C). -
Step 6
During the last 5-10 minutes of grilling, brush the chicken generously with the prepared Cherry Dr. Pepper glaze. Continue grilling, turning and basting, until the glaze is caramelized and sticky. -
Step 7
Remove the chicken from the grill and let it rest for a few minutes before serving.
Important Information
Nutrition Facts (Per Serving)
It is important to consider this information as approximate and not to use it as definitive health advice.
Allergy Information
Please check ingredients for potential allergens and consult a health professional if in doubt.