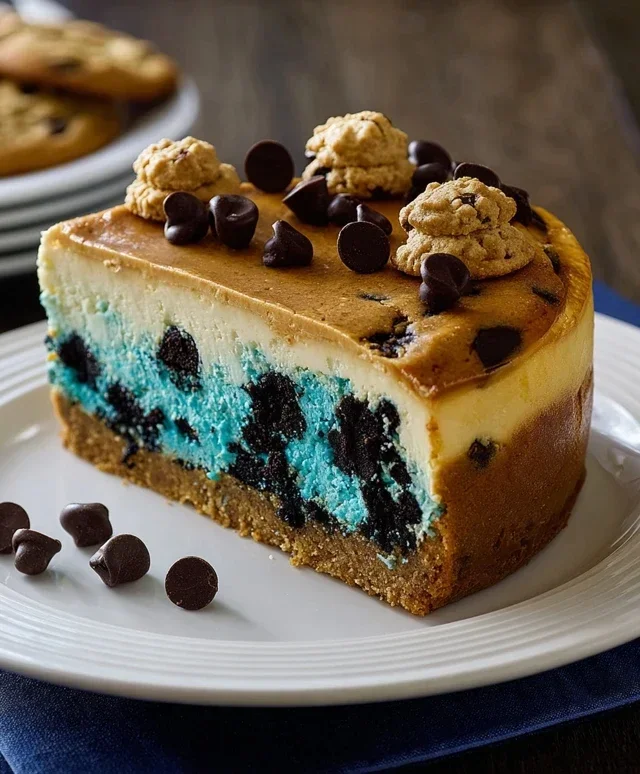
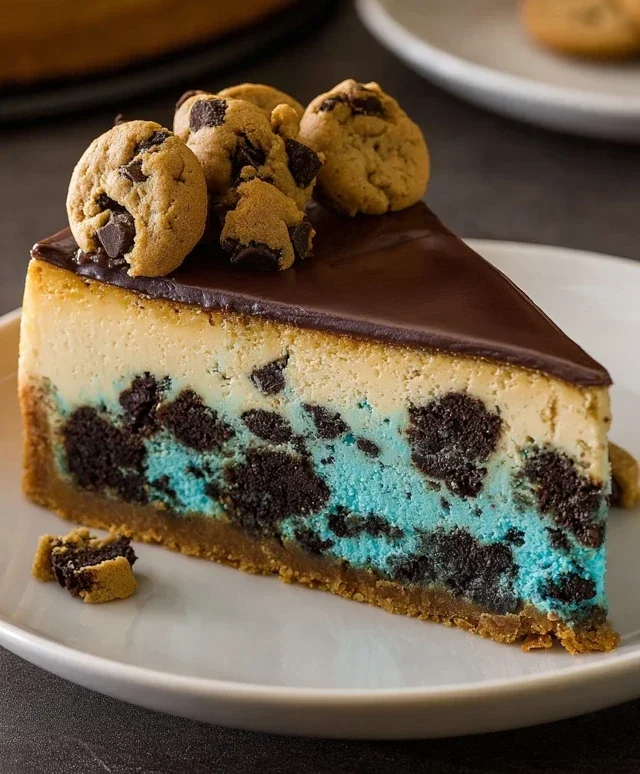
Cookie Monster Cheesecake – Fun Blue Treat
Get ready to unleash your inner cookie monster with this absolutely divine Cookie Monster Cheesecake! If you’re anything like me, the mere mention of this iconic dessert sends your taste buds into a joyful frenzy. Why do we all adore this vibrant creation? It’s a playful, decadent mashup of two beloved treats – creamy, dreamy cheesecake and the irresistible crunch of cookies. But this isn’t just any cookie cheesecake; our Cookie Monster Cheesecake takes it to a whole new level with its signature blue hue and generous swirls of chocolate chip cookie dough. It’s a showstopper that’s as fun to make as it is to devour. Imagin extracte a rich, velvety cheesecake base, studded with chunks of gooey cookie dough, all wrapped in a buttery crust. Seriously, what’s not to love? Prepare yourself for a truly unforgettable dessert experience that will have everyone beggin extractg for seconds!
Cookie Monster Cheesecake
Get ready to unleash your inner cookie monster with this ridiculously fun and absolutely delicious Cookie Monster Cheesecake! This isn’t just any cheesecake; it’s a vibrant, blue-hued masterpiece studded with chocolate chips, all built on a buttery, brown sugar-infused cookie crust. It’s the perfect dessert for birthdays, holidays, or just when you need a serious dose of comfort and color. Prepare for oohs and aahs because this cheesecake is a showstopper that tastes even better than it looks.
This recipe combines the best of both worlds: the comforting chegrape juicess of a chocolate chip cookie and the creamy, dreamy indulgence of a classic cheesecake. We’ll start by crafting a robust cookie crust, then move on to the luscious cheesecake filling that will be dyed that iconic Cookie Monster blue, and finally, bring it all together for a truly unforgettable dessert experience. Don’t be intimidated; this recipe is broken down into simple steps, and the result will be well worth your effort.
Ingredients:
Cookie Crust Preparation:
Let’s start by building the foundation of our delicious creation. In a medium bowl, combine the melted unsalted butter, 1/2 teaspoon salt, and the tightly packed brown sugar. Stir these together until well combined. This brown sugar will give our crust a wonderful depth of flavor and a slightly chewy texture. Next, add the 1 egg and 1 teaspoon of vanilla extract. Whisk everything together until you have a smooth, uniform mixture.
Now, it’s time for the dry ingredients. Gradually add the all-purpose flour to the wet ingredients, mixing until just combined. Be careful not to overmix the dough; we’re aiming for a cookie-like consistency. Finally, fold in the semisweet mini chocolate chips. These little morsels will bake into delightful pockets of chocolatey goodness within our crust.
Press this cookie dough mixture evenly into the bottom of a 9-inch springform pan. You can use the bottom of a glass or your fingers to create a firm, even layer. This is important for a sturdy crust that won’t crum extractble when you slice the cheesecake. Once pressed, place the springform pan in the freezer for at least 15 minutes while you prepare the cheesecake filling. This chilling step helps the crust set and prevents it from puffing up too much during baking.
Creamy Blue Cheesecake Filling:
Now for the star of the show – the creamy, vibrant cheesecake filling! In a large bowl, beat the softened cream cheese until it’s completely smooth and creamy, with no lumps. This is a crucial step for a silky-smooth cheesecake texture. You can use an electric mixer on medium speed for this. Once smooth, add the cornflour (cornstarch) and the pinch of salt. Beat again until incorporated. Cornflour helps to prevent the cheesecake from cracking.
Next, gradually add the granulated sugar and the 1 teaspoon of vanilla extract, beating until well combined and smooth. Now, we’re going to introduce the luscious whipping cream. Pour in the 1/2 cup of whipping cream and mix on low speed until just combined. Don’t overmix at this stage.
This is where the magic happens! Add your blue gel food coloring, a few drops at a time, and mix until you achieve your desired Cookie Monster blue. Gel food coloring is best as it’s highly concentrated and won’t add extra liquid to the batter. Start with a small amount and add more until you’re happy with the vibrant hue. Finally, add the 3 eggs, one at a time, mixing on low speed until each egg is just incorporated. Again, avoid overmixing, as this can incorporate too much air, leading to cracks. Scrape down the sides of the bowl with a spatula to ensure everything is evenly mixed.
Baking and Cooling for Perfection:
Gently pour the beautiful blue cheesecake filling over the chilled cookie crust in the springform pan. Smooth the top with a spatula. Now, let’s talk about baking. Cheesecakes are best baked in a water bath, which creates a humid environment and ensures even cooking, preventing cracks. To do this, wrap the outside of your springform pan tightly with a couple of layers of heavy-duty aluminum foil, making sure there are no gaps where water can seep in. Place the foil-wrapped pan into a larger baking pan (like a roasting pan). Carefully pour hot water into the larger pan until it comes about halfway up the sides of the springform pan.
Carefully transfer the entire setup to a preheated oven at 325°F (160°C). Bake for approximately 50-60 minutes, or until the edges of the cheesecake are set, but the center still has a slight jiggle (like Jell-O). The residual heat will continue to cook the cheesecake as it cools.
Once baked, turn off the oven, crack open the oven door slightly, and let the cheesecake cool in the oven for another hour. This gradual cooling process is another key to preventing cracks. After the hour in the oven, carefully remove the cheesecake from the water bath and place it on a wire rack to cool completely at room temperature. Once completely cooled, cover the cheesecake with plastic wrap and refrigerate for at least 6 hours, or preferably overnight, to allow it to firm up and the flavors to meld.
Before serving, run a thin knife around the edge of the cheesecake and then carefully release the springform pan. Decorate as desired – maybe with more chocolate chips, whipped cream, or even some blue sprinkles! Enjoy your spectacular Cookie Monster Cheesecake!
Conclusion:
And there you have it – the ultimate guide to creating your very own Cookie Monster Cheesecake! This recipe is an absolute showstopper, guaranteed to bring smiles and rave reviews to any gathering. The combination of creamy, rich cheesecake, the delightful crunch of chocolate chip cookies, and that iconic vibrant blue hue is simply irresistible. It’s a dessert that’s as fun to make as it is to devour, perfect for birthdays, holidays, or just a special treat to brighten your week. I truly encourage you to give this Cookie Monster Cheesecake a try; you won’t regret it!
For serving, I love to top each slice with a dollop of whipped cream and a few extra cookie crum extractbles or even a mini chocolate chip cookie. You could also serve it with a side of fresh berries for a touch of tartness. If you’re feeling adventurous with variations, consider adding mini M&Ms or even a swirl of chocolate ganache into the cheesecake batter for an extra layer of flavor and texture. Don’t be afraid to get creative and make it your own!
Frequently Asked Questions:
Can I make this cheesecake ahead of time?
Absolutely! Cheesecakes are often even better the next day. You can bake and chill your Cookie Monster Cheesecake for up to two days before serving. Just make sure it’s covered tightly to prevent it from drying out.
What if I don’t have blue food coloring?
While blue is key for the Cookie Monster aesthetic, you can certainly adapt! If you don’t have blue food coloring, you can omit it for a classic chocolate chip cookie cheesecake. Alternatively, you could use natural coloring options like butterfly pea flower powder, though the color intensity might vary.
Cookie Monster Cheesecake
A fun and vibrant blue cheesecake swirled with chocolate chips, inspired by Cookie Monster. Features a chocolate chip cookie crust and a creamy, delicious filling.
Ingredients
-
4 oz unsalted butter, melted
-
1/2 tsp salt
-
2.6 oz brown sugar, tightly packed
-
1 egg
-
1 tsp vanilla extract
-
4.4 oz all-purpose flour
-
4 oz semisweet mini chocolate chips
-
16 oz cream cheese, softened
-
2 tsp cornflour
-
3.5 oz granulated sugar
-
Pinch of salt
-
1/2 cup whipping cream
-
Blue gel food coloring
-
1 tsp vanilla extract
-
3 eggs
Instructions
-
Step 1
For the crust: Combine melted butter, 1/2 tsp salt, brown sugar, 1 egg, 1 tsp vanilla extract, flour, and 4 oz chocolate chips. Press into the bottom of a greased 9-inch springform pan. -
Step 2
Bake the crust at 350°F (175°C) for 10-12 minutes. Let cool. -
Step 3
For the filling: Beat cream cheese until smooth. Gradually add cornflour and granulated sugar, mixing until combined. -
Step 4
Add pinch of salt, 1/2 cup whipping cream, 1 tsp vanilla extract, and 3 eggs, one at a time, mixing until just combined. Do not overmix. -
Step 5
Add blue gel food coloring and mix until desired color is achieved. Gently fold in remaining 4 oz chocolate chips. -
Step 6
Pour filling over the cooled crust. Bake at 325°F (160°C) for 50-60 minutes, or until the edges are set and the center is slightly jiggly. -
Step 7
Turn off the oven and let the cheesecake cool in the oven with the door ajar for 1 hour. Then, remove and cool completely on a wire rack before refrigerating.
Important Information
Nutrition Facts (Per Serving)
It is important to consider this information as approximate and not to use it as definitive health advice.
Allergy Information
Please check ingredients for potential allergens and consult a health professional if in doubt.